
In this activity, we were tasked to explore morphological operations. But first, what do we mean by morphology? The morphology of an object refers to its shape and structure. Morphological operations are commonly used in image processing to manipulate the shape and structure of our image. As examples, we can do the following with the use of morphological operations, we can:
- get the outline of our image.
- enlarge and reduce the size of our image
- fill in the gaps or spaces in our image
- isolate specific portions or regions of our image
- clean our image of unwanted spots or blobs
and the list goes on. You see, morphological operation is such a POWERFUL tool in the field of image processing. In this activity, we are going to venture various morphological operations and their applications.
I. Dilation and Erosion
The first two morphological operations are dilation and erosion. From their root names, the dilation process dilates the image while the erosion process erodes the image. Mathematically, the dilation(


Confused? So am I 😁. Let’s see what these two processes do.

Shown in Figure 1 are the objects we are going to process. We have a square image, a triangle image, a hollow square image and plus sign image. We were asked to predict and the results when each of these images were eroded or dilated with the following structuring elements shown in Figure 2.

The scanned images of the predicted result are shown in Figures 3 – 7. The x marks written in pencil are the original elements of the image while the x marks written with red ink represent the added elements (after dilation) and the retained elements (after erosion). In predicting these results, it is important to note that an origin must be set in the structuring element. This origin will serve as your guide in marking what parts should be eroded or dilated. Let’s take for example the 5 x 5 square dilated with a 2 x 2 square having the right bottom portion as its origin. Imagine that each component in your 5 x 5 square will be placed in the position of the origin in the structuring element. Let’s take the first (upper left most) square as a reference. Since the first square will be in the position of the origin, three squares were placed to its adjacent sides (one up, one left, one diagonal left) to satisfy the shape of the structuring element. This process will be done for each square in your image. On the other hand, for the erosion process each pixel/square of the image will also be placed in the position of the origin of the structuring element. If the pixel satisfies the structuring element, that is having three pixels (one up, one left, one diagonal left) on its sides in this case then that pixel will retain. Otherwise, it will be eroded or removed in the final image. You can watch this video for better understanding of what happens during the erosion and dilation process: Dilation and Erosion video (special thanks to Kit Guial for sharing this video to me).


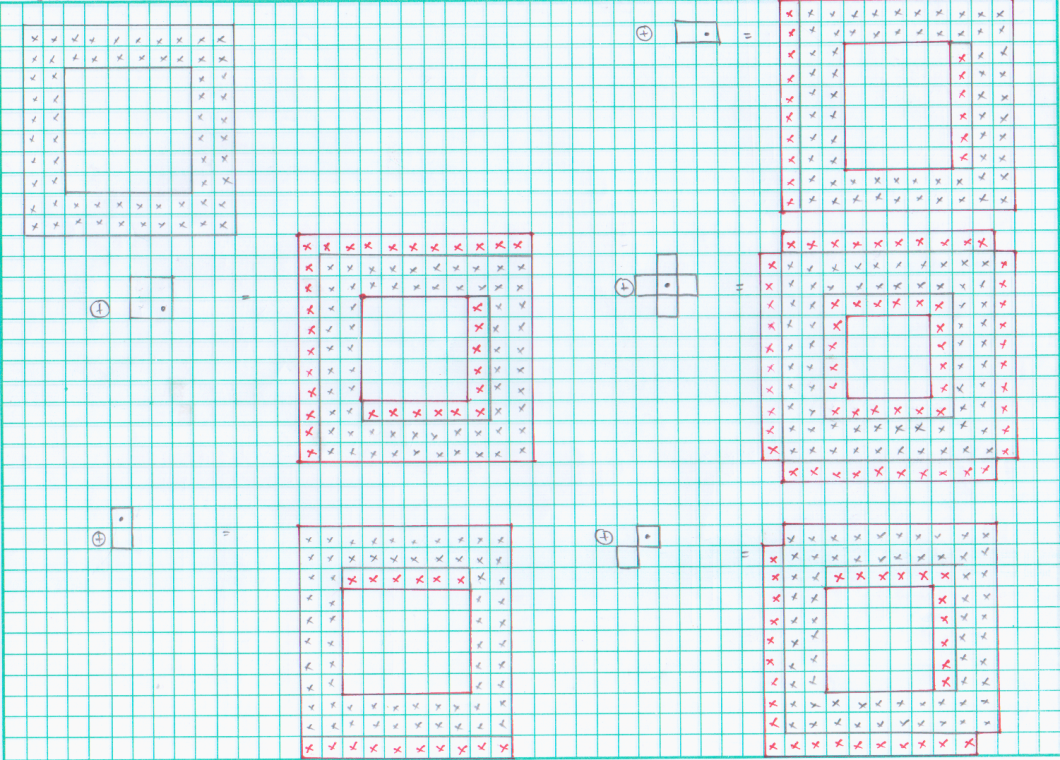


To verify if our predicted drawings were correct, the erosion and dilation morphological operations were performed in Scilab. The results are presented below in Figures 9-12. At first, some of my predicted results do not coincide with the simulated ones and then I figure out that Scilab and I do not have the same origin in the structuring elements. I asked Mich Cirunay on the placement of her structuring element’s origin (because she obtained the same results with Scilab) and she said that her origin was consistently on the left-bottom most pixel (except for the plus sign where it is in the middle pixel). So rather than changing the origins of my structuring element and repeating the process all over again, I positioned all my structuring elements in a 3 x 3 grid such that the origin of my structuring element falls of on the middle of the 3 x 3 grid (Figure 8). Aaaaaaand it works! Yey! 👌


II. Application of Morphological Operations
After learning the process of erosion and dilation, we’re now ready for more complex operations and some applications of morphological operations. We have another three operators–closing, opening and tophat. Based from their package descriptions, the closing operator retains light objects and removes the dark objects. This operator specifically preserve the preserve background regions that have a similar shape to the structuring element while eliminating all other regions of background pixels. The open operator, on the other hand, retains dark objects and removes light objects. It preserves the foreground regions that have a similar shape to this structuring element while eliminating all other regions of foreground pixels. And the top hat operator applies the top hat filter which emphasizes light objects that the structuring element does not fit in. All of the said operators are derivatives of the erosion and dilation operators.
To fully comprehend these operators, let’s see what they do in the image shown in Figure 13.

I have chosen a circular structuring element with radius that varies from r = 1, r = 5 and r = 9. The results of the image operated with the structuring element are shown in Figure 14. Notice that when in the closing operator, the blobs get connected to each other when the radius of the structuring element increases This is due to the fact that the closing operator preserves the bakcground regions with the same size as the structuring element. On the other hand, the opening operator tends to isolate blobs in such a way that it fills in the gaps or holes in the blobs. Lastly, the tophat operator seems to give the outlines of the blobs because this operator emphasizes in which the structuring element does not fit in.

And now for the application *cue drum roll*, we will segment cancer cells! Shown in Figure 15a is a picture of paper circles that represent nomal and abnormal sized cells. we want to isolate the abnormal size cells because they are our ‘cancer’ cells in this image. To be able to do that, we are going to use morphological operators. First, we segment the image using thresholding (see Act#7: Image Segmentation) as shown in Fig 15b. Next, the opening operator was applied and by the right structuring element and area measurements, the result is shown in Figure 15c. As we can see in the picture, there are five abnormally sized cells. Going back to the original image, I numbered the paper circles that were determined as our cancer cells.

And that is just one of the many applications of morphological operations. Amazing, isn’t it? 🙌 Morphological operations are really powerful. 😺

Over all, I would rate myself 10/10 for in this activity because I was able to do the assigned tasks. I would like to thank Kit Guial and Mich Cirunay for their help in this activity. 😏
References:
[1] Soriano, M., “A8-Morphological Operations”, Applied Physics 186 Manual, 2014.
[2] R. Fisher, S. Perkins, A. Walker and E. Wolfart., “Opening”, Retrieved from: http://homepages.inf.ed.ac.uk/rbf/HIPR2/open.htm
[3] [2] R. Fisher, S. Perkins, A. Walker and E. Wolfart., “Closing”, Retrieved from: http://homepages.inf.ed.ac.uk/rbf/HIPR2/close.htm
